Knowing where a tool is right now is only half the battle. The other half is knowing where it needs to be next week — and whether it’s already promised to another job. The Calendar is your forward-planning workspace. It sits alongside your live inventory and lets you reserve assets for a future window, plan a whole kit for a job in one go, and re-shuffle the week with a drag of the finger when plans change.
A booking is a plan, not a record of reality. A booking says where an asset *should* be; the scan-based check-in/out system still records where it *actually* is. The two work together — the Calendar shows a small flag on each booking telling you whether the asset has been checked in where it’s supposed to be — but booking something never moves it, and scanning something never changes the plan.
You’ll find the Calendar in the main menu (and under Manage on a phone).
The three views, on tabs
Across the top of the Calendar page you’ll see three tabs, styled like the tabs in Settings:
- Asset scheduler — one row per asset (or per kit, see below), with bookings shown as horizontal bars across a time axis. The clearest “what’s where, when” picture; desktop only.
- Bookings — a card-based list of every booking in the visible window. Quick to read on a phone, and every card has its own delete button.
- Calendar — a familiar Day / Week / Month grid with bookings shown as colour-coded chips, plus drag-and-drop rescheduling.
All three tabs share the same date range and filters, so switching between them never loses your place.
The shared controls
Above the tabs sit two cards. The first holds the date range; the second holds the filters and search. They drive every tab on the page.
The date range card
From left to right: a back arrow, three pill buttons (Day / Week / Month), a forward arrow, the From and To date pickers, and a Today button. The pills set the size of the window; the arrows step it backwards or forwards by that size. So clicking Week then > moves you a week ahead. You can also type any dates straight into From and To — they don’t have to be a clean day, week or month.
On the right of the same card, a small bookings count appears on limited plans (e.g. “16 / 100 bookings”) with a discreet Upgrade link.
The filters card
The Show: row toggles which kinds of cards appear, with one set of options for the Scheduler and Bookings tabs (Booked / Not booked / Assets ⊙ Kits ⊙ Assets and Kits / Include unbooked lists) and another for the Calendar tab (Bookings / Projects).
Underneath, a search box filters across booking name, notes, asset name and project name as you type. To its right sit the Assets dropdown (open it to tick specific assets), and dropdowns for Project, Client, Location, Status and Type. A Clear button resets everything in one click.
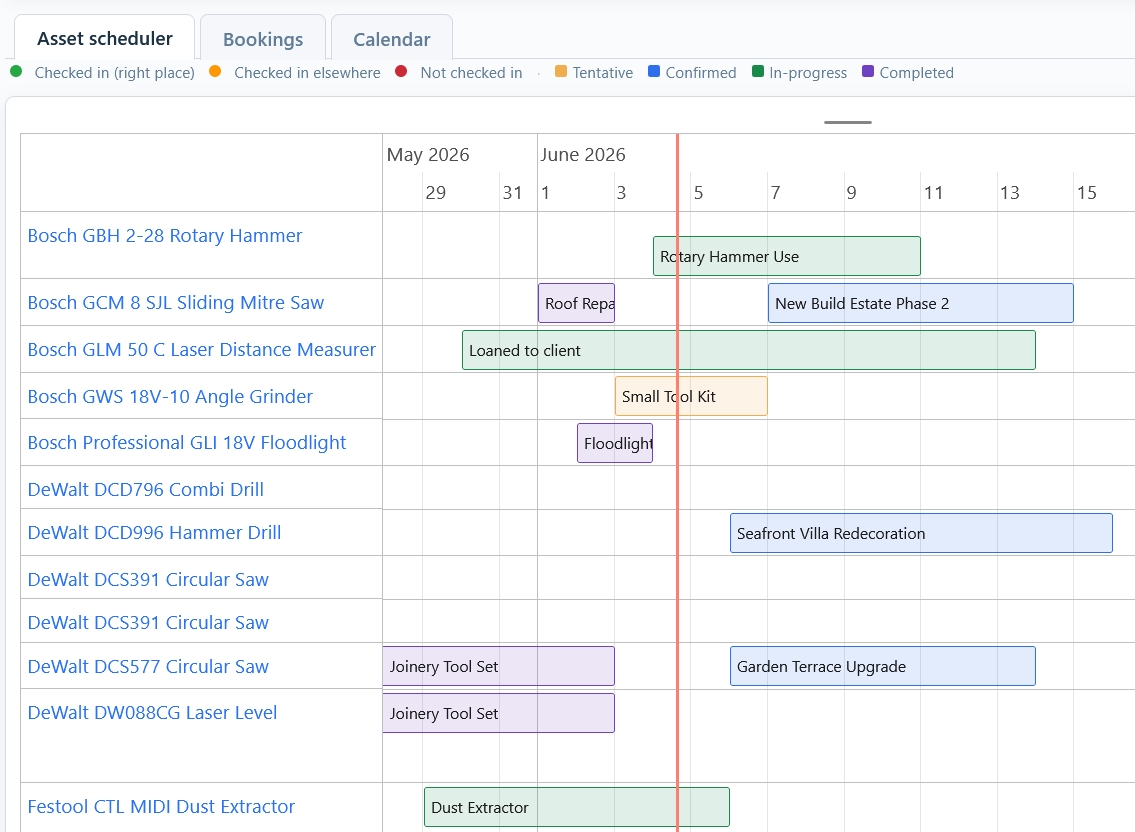
The Asset Scheduler
The Scheduler is the most powerful of the three views and is worth getting comfortable with.
Reading the rows
Each row is a single asset (or, optionally, a whole kit — see below). The asset’s name sits on the left; the time grid runs across the rest of the row, with one rectangle per grid step. As you zoom in or out, the rectangles intelligently re-size — 15 minutes, 30 minutes, 1 hour, 2 hours, 4 hours, 6 hours, 12 hours, 1 day, 2 days, 4 days, 1 week, 2 weeks, 1 month — so you always see a sensible number of rectangles for the window you’re looking at.
Today on the left
When you first open the Scheduler — or click Today — the window is set with today’s date on the left edge and roughly the next ten days forward. So you see the immediate future at a glance, not the recent past.
Zoom and pan
Use the mouse wheel to zoom in and out, and drag the time bar (or the scrollbars above and below the grid) to pan backwards and forwards. About a second after you settle on a new window, the From and To pickers on the card above quietly update to match — so when you switch to the Bookings tab afterwards, it shows exactly the same period as the Scheduler.
Click an empty rectangle to create a booking
A single tap on any empty rectangle opens the new-booking modal with the asset and date/time already filled in to the exact bounds of that rectangle. So if a rectangle represents “Tuesday 4pm to 5pm”, the booking opens as 16:00 to 17:00 on the right day. If the rectangle covers a whole week, you get a week-long all-day booking. You only need to fill in the *what* — asset, status, who it’s for — the *when* is already done.
Drag across rectangles to span a range
To book a longer window, press and drag horizontally on the same row. A translucent rectangle follows your finger to show what you’re booking. Release, and the modal opens with that asset and the spanned date range already filled in.
Long-press to drag-reschedule a booking
A short click on a booking pill opens it to edit, just like always. To drag a booking to a new time, press and hold on the pill for about half a second — the cursor changes to a left/right arrow and the pill picks up a coloured ring. Now drag horizontally to the new time and release. The booking shifts, a small “Booking rescheduled to…” message appears at the bottom-right with an Undo link, and that’s it.
The long-press is deliberate: a quick click should always open the booking (not move it), and you don’t want to accidentally drag something while you’re trying to read it. If a booking belongs to a kit, dragging it moves every asset in the kit together so the kit stays in lock-step.
The mode radio: Assets / Kits / Assets and Kits
The Show: row on the filters card has a three-way radio. Assets is the default — one row per asset. Kits swaps the row list out for one row per kit booking, with a single pill spanning the whole kit’s window — handy when you’re juggling several large kit bookings and don’t need to see them as a wall of individual asset pills. Assets and Kits shows both, so the same booking appears both on its asset’s row and on the kit’s row.
Include unbooked lists
Tick Include unbooked lists (visible whenever the mode is Kits or Assets and Kits) and any saved list that isn’t currently part of an active kit booking shows up as an empty row. Click the row to open the kit modal with that list’s assets already loaded — a one-tap way to mobilise a job’s standard kit.
The Bookings tab
This is the simplest, most readable view, and the easiest to use on a phone.
Each card shows the date range on the left, then a main panel with the booking name as the title (or the asset name if no custom name was set), a labelled row of Asset, Client, Project, Location and Assigned user, and a truncated line of Notes if any (hover for the full text). On the right sits the status and a small × delete button.
Same mode radio
The Asset / Kits / Assets and Kits radio applies here too: Assets hides kit bookings, Kits collapses every kit group to a single card, and Assets and Kits shows everything. The same Include unbooked lists option adds a “Book kit” row for any list you haven’t already booked.
Deleting a booking
Click the × at the right of any card to delete that booking. Kit-booking cards delete the entire kit (every member is cancelled in one action). Cancelled bookings are kept in Card Focus: Activity History for the record.
The Calendar tab
A familiar grid view, with a Day / Week / Month sub-mode picker tied to the same date-range card. The current day is highlighted; project chips (purple, with a folder icon) appear across every day they cover, and bookings appear on every day they span. The day view also shows the day’s date right at the top.
Drag a chip to a new day
Pick up a booking chip and drop it on any other day to reschedule it. Timed bookings preserve their time-of-day; all-day bookings preserve their span. Drop a chip onto a different hour row in the Day view to change the start hour. Project chips work the same way — drag one to a new day and the project’s start and end dates both shift by the same number of days. A toast appears with an Undo link.
Click an empty day
Tap any empty cell to open a new-booking modal for that day. The Day view’s hour rows preset the start hour to where you tapped.
“+ N more” and Show less
When a day has more than four chips, a clickable “+ N more” appears at the bottom of the cell. Click it to expand the cell vertically and show up to about a calendar’s worth of chips — the expanded cell pops up over its neighbours so the surrounding grid stays neat. A Show less link collapses it back. If the day still has too many chips for the expanded cell, a final “+ X more” line shows the rest are hidden.
Project chips link to the project
Clicking a project chip takes you straight to the Edit Project page for that project, with the existing dates pre-filled — so changing scope is a one-click jump.
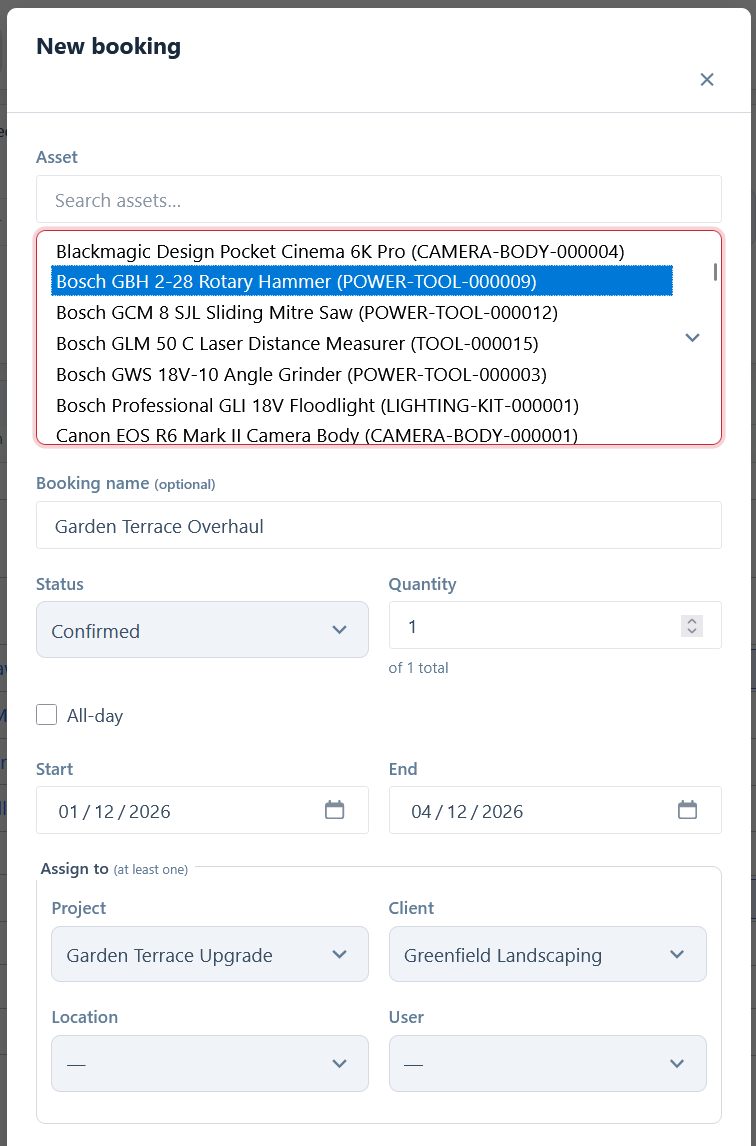
Making a single booking
- Click + New booking.
- Search for and select the asset.
- Optionally give the booking a name — handy for things like “Henderson loft, first fix” so the row label says that, not just the tool name.
- Choose a status (see below) and, if the asset is a multi-quantity item, how many units you need.
- Tick All-day for a whole-day booking, or leave it unticked to set specific times.
- Set the start and end.
- Under Assign to, pick at least one of Project, Client, Location or User. You can set more than one.
- The availability line tells you instantly whether there’s enough free in that window. Click Save booking.
If the asset isn’t available in that window, the booking is blocked and the clash is explained — so you can’t accidentally double-book.
Booking statuses
Bookings move through these planning states (this is separate from an asset’s normal status):
- Tentative — a planning hold. Tentative bookings reserve the asset just like a confirmed booking, so two people can’t both tentatively grab the same tool for the same day. (Use the Notes field if you want to record that the plan is provisional.)
- Confirmed — a firm reservation.
- In-progress — set automatically when the booking’s start time arrives.
- Completed — set automatically when the end time passes, but you can also set it manually if a job wraps early.
- Cancelled — set by clicking the delete button or Cancel booking. Cancelled bookings disappear from every view but stay in the asset’s history.
When a confirmed booking goes live, Asset Giant automatically updates the asset’s assigned project, client and location to match (only the ones you set on the booking), and records the change in Card Focus: Activity History so there’s a full trail of who planned what.
Booking a kit for a job
Most real jobs need a set of tools, not one. A kit booking reserves several assets in one action and ties them all to the same job — and on the calendar they move, edit and cancel as a single unit.
Opening the kit modal
Click + Kit booking at the top of the Calendar. The kit modal lets you build the asset list, set one window and target for everything in it, and create or edit the booking.
Adding assets
There are two ways:
- Pick assets manually. Type into the search box, then hold Shift for a range or Ctrl/Cmd to pick several at once in the multi-select list, and click Add selected →. The asset appears in the selection panel with a quantity input you can adjust.
- Pull in a saved list. Click Choose list… to pick a Creating and Managing Lists you already use for that type of job — every bookable asset on the list is added in one click. You can keep adding individual assets afterwards if you need extras.
Setting the kit’s window and target
Set the start and end (or tick All-day), pick a status, and choose at least one of Project, Client, Location or User under Assign to. These apply to every booking in the kit. Give the kit a name if you want a clear label across the calendar — for example “Henderson loft — first fix”.
Saving and conflicts
Click Create kit bookings. Asset Giant checks every asset against the chosen window and tells you about any clashes before committing — so you can swap an item or move the date without losing your selection. If everything’s free, the bookings are created as a single linked group.
Save as list
Found the kit you used works well? Click Save as list in the modal footer to turn the current selection into a Creating and Managing Lists for next time, without losing your place in the kit modal. Next time you can pull the whole kit in via Choose list… in a single click.
Editing a kit
Open any booking that’s part of a kit and the kit edit modal appears (not the single-booking one). It opens collapsed — you see the kit’s window, target and member list at a glance. Click Edit asset list to add or remove items, and Save changes to apply.
Deleting a kit
Click Cancel booking in the kit modal footer, or × on the kit’s card in the Bookings tab, to cancel every member at once. The members stay in Card Focus: Activity History for the record.
Drag a kit on the Scheduler
In the Scheduler’s Kits or Assets and Kits mode, long-press a kit pill and drag horizontally to move the whole kit. Every asset in the kit shifts by the same amount, preserving the kit’s internal shape.
The reality flag
Each booking shows a small coloured dot on it:
- Green — the asset has been checked in at the right place.
- Amber — the asset is checked in, but somewhere different.
- Red — the asset should be on site by now but hasn’t been scanned in.
- No dot — the booking hasn’t started yet, or has no location target.
It’s a quick “is the plan happening?” cue without you having to look anywhere else.
Sharing your calendar (paid plans)
On a paid plan you can subscribe your phone or desktop calendar (Google, Outlook, Apple) to a read-only feed of your bookings — and of your projects, or a tidy once-a-day summary. Open iCal feeds on the Calendar page to copy a feed link. For the full rundown of every feed and how to add it to your calendar, see Calendar Feeds: See Your Bookings in Google, Outlook & Your Phone.
Plan limits
Free plans allow a fixed number of active bookings (cancelled and completed bookings don’t count). When you reach the limit, the “+ New booking” / “+ Kit booking” / empty-cell click all open an upgrade prompt instead of the booking modal — so you find out before you’ve filled the form in, not after.
A few things worth remembering
- The plan is just a plan. Bookings never move tools. Only a scan does that.
- Tentative reserves. If you want to keep something flexible, name it accordingly in the booking name or notes — but the slot is held.
- Drag and drop is everywhere. Long-press to move a Scheduler pill; drag a Calendar chip to a new day; both work on individual bookings and whole kits.
- Every reschedule and delete can be undone — every toast carries an Undo link for a few seconds.