
You can export any list into a clean, professional PDF or a flexible CSV file. This is useful for creating client-facing documents, printing job sheets for your team, or analyzing data in a spreadsheet.
How to Export a List
- Navigate to the list you want to export by clicking its name in the Lists Viewer.
- On the Manage List page, click the “Export List…” button in the header.
- The Export Assets modal will appear.
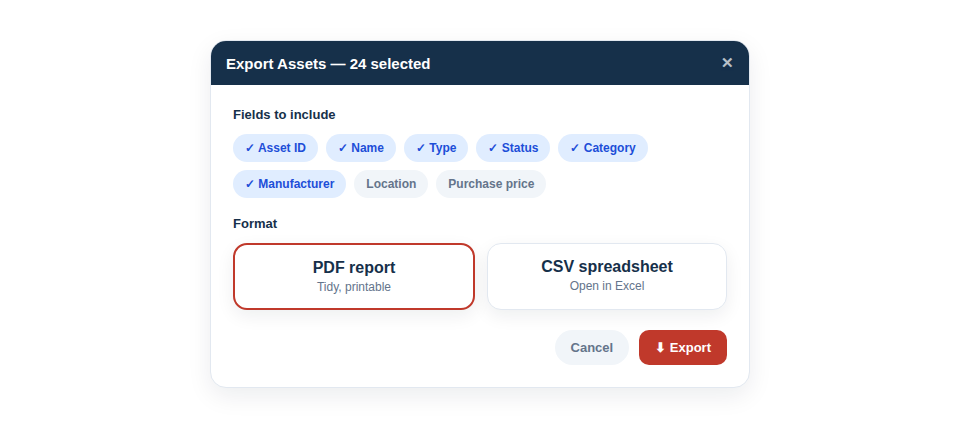
Choosing Your Export Options
In the modal, you have several options:
- Choose Fields: You can choose to export all available information for each asset, or select specific fields. When exporting a list, you can also choose to include the List Title, List Description, and Section Headings.
- Choose Format (Buttons):
- Export as CSV: Creates a .csv file that can be opened in spreadsheet software like Microsoft Excel or Google Sheets. Any section headings in your list will appear as formatted rows in the spreadsheet.
- Export as PDF: Creates a print-ready .pdf document. Your company logo and name will appear in the header. Any section headings in your list will be formatted as large titles, creating a beautifully structured document.
- Maintenance columns: Once you have set up repeating jobs, three more fields are offered under a Maintenance heading — Maintenance Next Due, Maintenance Next Due Job and Maintenance Schedule, which puts every job on the item into one cell. Tick them for a test register you can hand to a client or an auditor (see Setting Up Maintenance and Test Schedules).
If the list holds any substitute lines — “any one of these” — you are asked what they should show: just the line name and how it is satisfied, which is right for a sheet somebody is going to fill in, or a particular asset for each line, with all its columns, which is right for a record of what actually went. Your choice is used for that export only and is not written back to the list (see Adding Substitute Items to a List).
Once you have made your selections, click the appropriate button. Your file will be generated and downloaded by your browser.
Printing it as a blank tick sheet instead
Export List… produces a record of what is on the list. If what you want is an empty sheet to fill in by hand on site, use Print Checklist… in the same Actions menu: the same field picker, a tick box beside every row, your logo at the top and a signature line at the bottom. See Printing a Blank Paper Checklist.
Going the Other Way
Exporting also gives you a head start on bulk editing. Export to CSV, make your changes in Excel or Google Sheets, then bring the file back in from Settings → Import with the matching rule set to “update the existing asset”. Our export column headings are exactly the ones the importer recognises, so the round trip lines up column for column. See Importing Your Existing Spreadsheet.