
Asset Giant keeps the proof of a repeating job on the asset it was done to. You describe the job once — what it is called, how often it comes round, which kinds of asset it applies to — add it to the items it covers, and from then on each one you record keeps the date, who did it, how it went, what it cost and the certificate. When an auditor, a client or an insurer asks when the ladder was last inspected, the answer is on the ladder.
Three screens do the work, and they are quick to learn:
- Settings then Maintenance holds your library of jobs — PAT test, LOLER thorough examination, calibration, service.
- Each asset has a Maintenance & Testing card where you add the jobs that apply to it and record each one as done.
- Settings then Alerts turns the next due date into an email before it passes.
Step 1: Set up your jobs
Go to Settings then Maintenance. The first card, Maintenance & Test Types, is your library.
If you are starting from nothing, press Add the common UK trade jobs and eight are created for you, each with a sensible interval: PAT test (every 12 months), LOLER thorough examination (6 months), Calibration (12 months), Service (12 months), Oil change (6 months), Disc or filter replacement (3 months), HAVS check (12 months) and LEV test (14 months). Edit any of them, rename them to match your own paperwork, or delete the ones you do not need.
To write your own, press Add a Job and fill in the sheet:
- What is the job called? The words your team already uses — “PAT test”, “Thorough examination”, “Annual service”, “Head calibration”.
- Repeats every — a number and a unit: days, weeks or months. Twelve months for a PAT test, six for a LOLER examination. Leave it at 0 if the interval differs from asset to asset and you would rather set it on each one.
- How did it go? — the answers this job offers. Every job starts with Pass, Fail and Remedial work needed. Add your own answers, rename them, or press Back to the standard three to start again. See below for the tick box beside each answer, which is the important part.
- Shows on — which assets this job can be added to. Leave both pickers on All and the job can go on anything. Narrow it by asset type, by category, or by both, and it is only offered where it fits: LOLER on your lifting gear, PAT and calibration on your power tools. A category covers everything filed under it, sub-categories included. With both set you also choose whether an asset must match both the type and the category or either the type or the category.
- Ask for a certificate when this is done — a prompt on the recording sheet. It is a reminder, not a rule, so a test can still be recorded when the paperwork is in a filing cabinet.
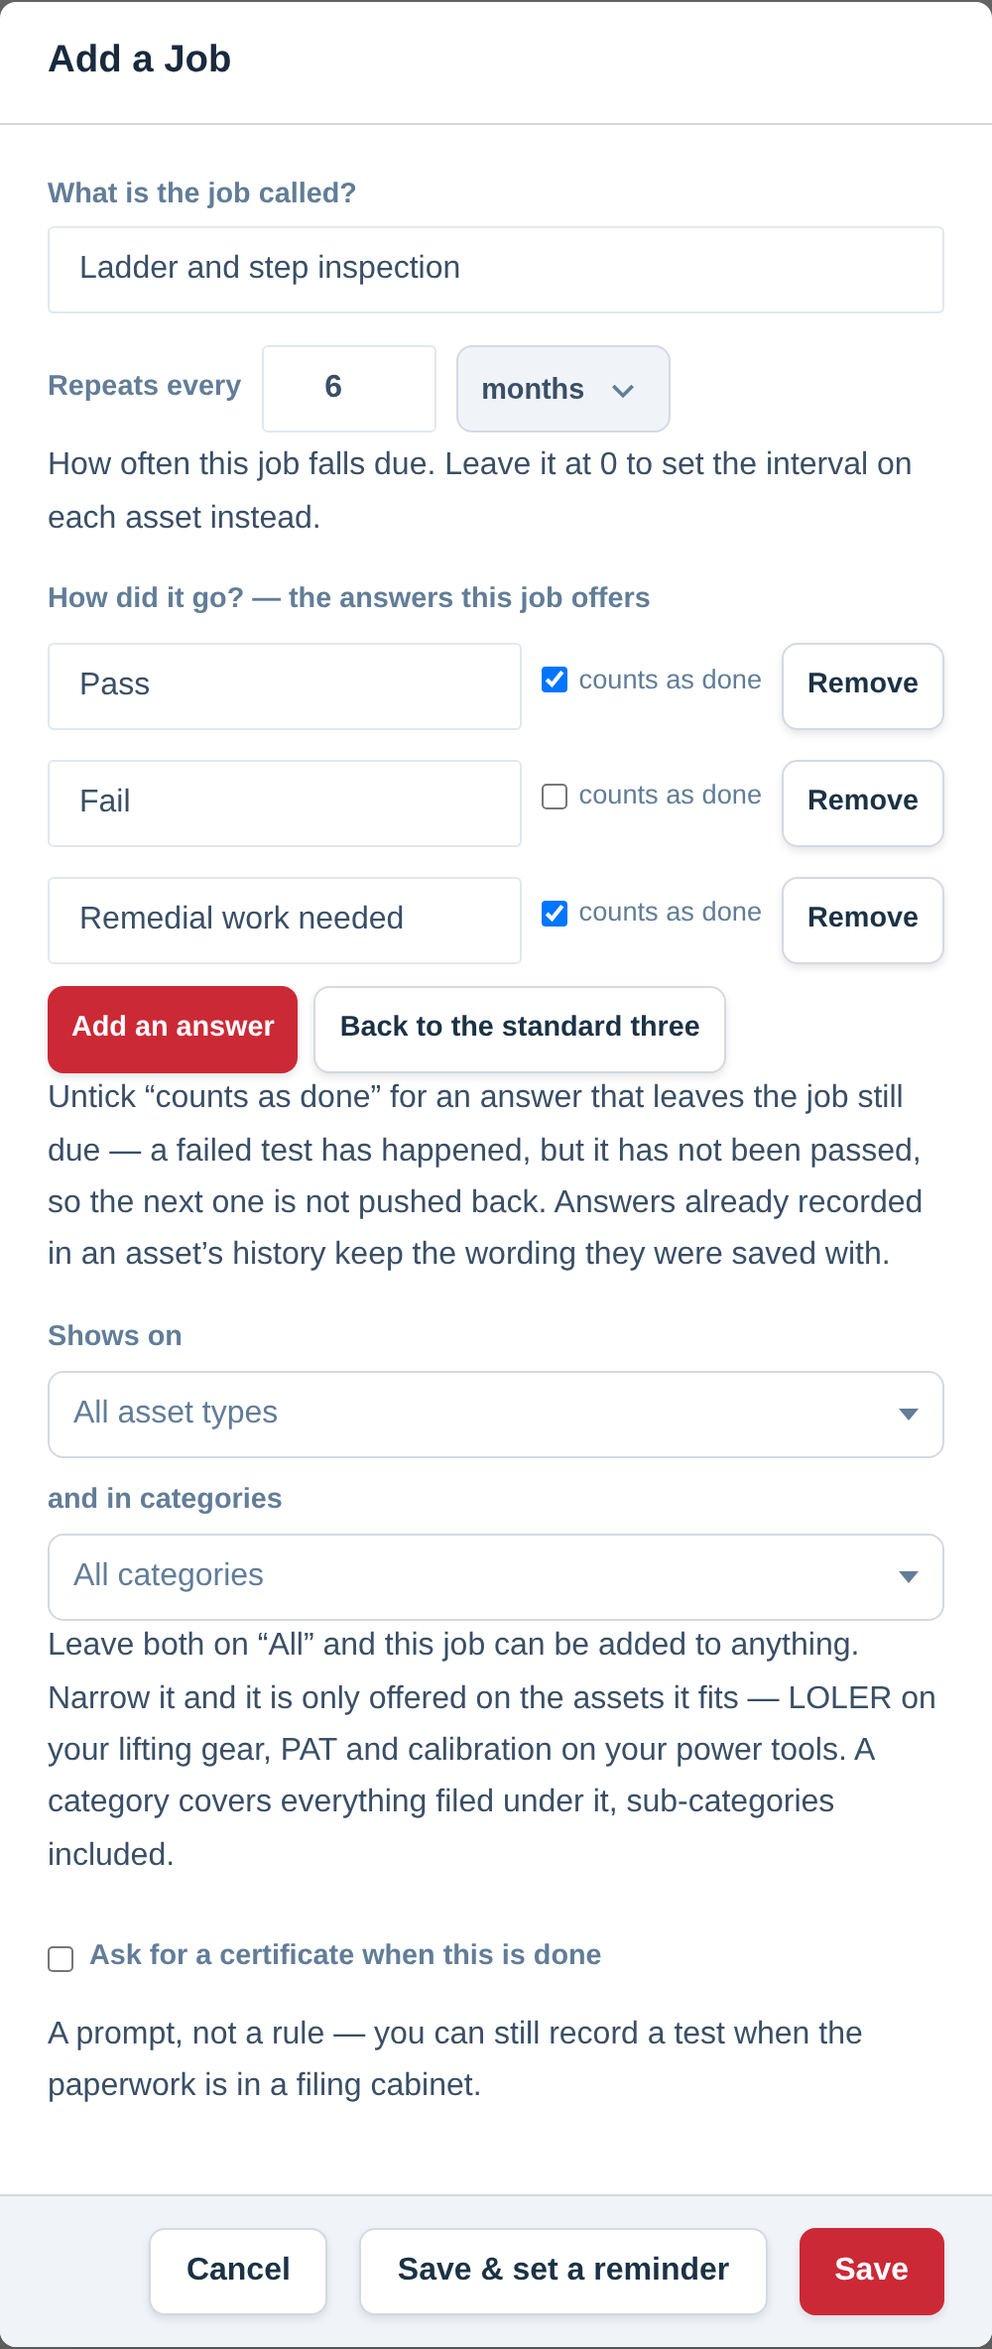
Press Save, or press Save & set a reminder to go straight to a new alert rule with this job already chosen.
The tick box beside each answer
Each answer carries a counts as done tick, and that tick — not the wording — decides whether recording the answer moves the next due date forward.
- Pass counts as done, so recording it sets the next date one interval later.
- Fail does not. The attempt is kept in the history with its date, but the job stays due, which is what you want from a test the item did not pass.
- Remedial work needed counts as done by default. Untick it if, in your company, remedial work leaves the item still waiting on its real test.
Answers already saved in an asset’s history keep the wording they were saved with, so renaming an answer never rewrites last year’s records.
Step 2: Add a job to your assets
Open an asset and find the Maintenance & Testing card. Under Add a job, choose from the list — it offers only the jobs whose Shows on settings fit this asset, so there is nothing irrelevant to scroll past. The job appears straight away with its interval and, once you tell it when it was last done, its next due date.
Each job on the card has its own Job settings, where you can:
- Change the interval for this asset only — a hire fleet machine serviced every three months while the rest are annual.
- Set Last done — the date to use when you are bringing an existing record across from a spreadsheet or a wall chart. Day to day, use Record it as done instead so the history is kept.
- Say whose job it is — one person on your team, so a reminder can go to them rather than to everybody.
- Add notes — the test house, the account number, anything the next person needs.
To put one job on many assets at once, tick them in your inventory and choose Schedule maintenance… from the bulk actions menu. Pick the job, confirm the interval, optionally set a last-done date for all of them, and the schedule lands on every item you ticked (see Edit, Move or Delete Many Assets at Once).
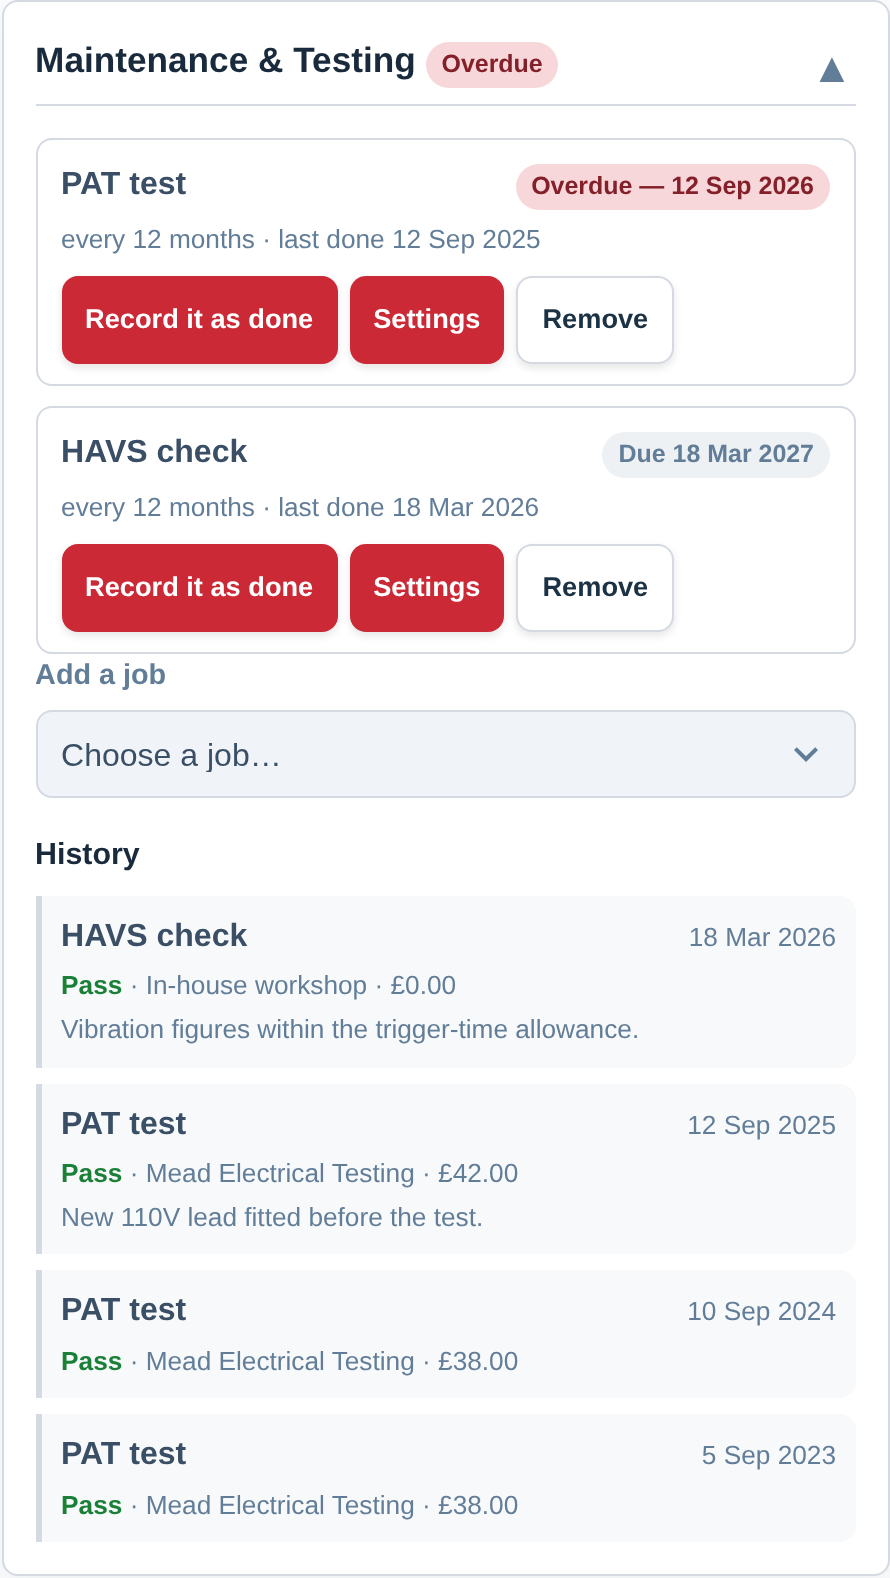
Step 3: Record a job as done
Press Record it as done on the job and fill in the sheet:
- When was it done? The next date is worked out from this one, so a test done three weeks late moves the next one three weeks later rather than quietly keeping the old cycle.
- How did it go? The answers you gave that job. Choose one that does not count as done and the item stays due, with the attempt recorded.
- Who did it? Optional — your own electrician, or “Jim at SafeTest Ltd”.
- What did it cost? Optional, and useful when you are deciding whether to keep repairing a machine.
- Certificate. Optional. Attach the PDF or a photo of the sheet and it lives with the record. It counts towards your plan’s storage like any other file on an asset (see Check Your Plan, Your Usage and What You Can Add).
- Notes. Optional — a reading, a fault found, a part to order next time.
Press Record it and the next due date rolls forward.
To record the same job on many assets at once — a tester who has just worked through twenty items in the yard — tick them in your inventory and choose Record maintenance…. One date, one answer and one set of details are written against every item you ticked.
The history on each asset
Below the schedules, the History section lists every job ever recorded on that asset, newest first, with its date, answer, who did it, the cost and the certificate. Five show at a time, with Newer and Older to page through the rest.
The history is permanent. Removing a job from an asset stops it being due in future and leaves every record and certificate exactly where it is, so the proof that the test happened never depends on the schedule still being there.
Step 4: Be told before a date passes
Go to Settings then Alerts and press + New rule. Under Remind about, choose Maintenance or testing due, then pick the job to watch — or Any job, to cover the lot in one rule. Everything else works as it does for any other reminder (see Getting Alerts Before a Date Passes):
- Which items — all of them, or narrowed by asset type, category, folder, location or status.
- Tell me — how far ahead. Thirty days is the usual starting point for a test that needs booking.
- Who gets it — people on your team, the person the job is assigned to, and up to ten outside addresses such as your testing contractor.
- Each item, or a summary — forty PAT tests due next month as one list, or one email each.
The same dates feed the inventory’s Due within filter: choose Maintenance or testing as the source and you have your testing round for the month, on any plan (see Find One Tool Fast: Filtering Your Inventory).
Bringing an existing register in from a spreadsheet
If your test dates are in a spreadsheet today, set the jobs up first and then import. On the matching step, every job in your library appears as a column you can map — PAT test — last done, LOLER thorough examination — last done, and so on. Map your column of dates to the job, and each item arrives with the job on it, the date it was last done and its next due date worked out. A blank cell simply leaves that item off that schedule (see Importing Your Existing Spreadsheet).
Taking it back out again
Three export columns are offered once you have a job library, under a Maintenance heading in the field picker: Maintenance Next Due, Maintenance Next Due Job and Maintenance Schedule — every job on the item in one cell. Tick them for a register you can hand to a client or an auditor (see Exporting a List to PDF or CSV).
Archiving a job you no longer use
Open the job in Settings then Maintenance and tick Archived. It stops being offered on new assets and stops its reminders, and every date and certificate already recorded is kept.
Who can do what
- Setting up the job library is part of company settings, so the Owner and Admin roles can do it.
- Adding a job to an asset and recording one as done goes with editing assets, so Members can do it too — the person who did the test is usually the person who should record it (see User Roles: Owner, Admin, Member, Scanner and Viewer).
A date field or a maintenance job?
Both work, and they are good at different things.
| Use a date custom field when | Use a maintenance job when |
|---|---|
| One date is all you need — an MOT, an insurance renewal, a licence running out. | The job comes round again and you want last time’s result kept as well as next time’s date. |
| Nothing has to be proved afterwards. | You need the certificate, who did it, the cost, or a pass-or-fail answer. |
| The date is per asset and unrelated to any other. | The same job runs across a whole class of assets and you want it set up once. |
They sit happily side by side. When your company already has a repeating date field, Settings then Maintenance points it out and offers to set a job up alongside it, without changing the field (see Add Your Own Fields to Track Anything Extra).
For what this looks like from the outside, see Maintenance & Testing Schedules (feature overview). For recording who is allowed to use the kit, see Recording Who Is Trained on What.